Design and manufacturer process of a waste incinerator
- Photo 1: CFD analysis
- Photo 2: stress analysis of a frame
- Photo 3: Lay out example of flue gas treatment system
- Photo 4: Double dosing unit system
- Photo 5: Double dosing unit system
- Photo 6: Lay out example of a dry + wet flue gas treatment system
- Photo 7 : Single dosing unit
Incinerator design, engineering and manufacture
The production process of a waste incinerator contains several steps:
- Pre-engineering and sales
- Detailed process design and engineering
- Manufacturing and purchase of instruments
- Assembling on site
- Testing and commissioning
- Warranty period, operation, service after sales and feedback to improve design
Every step is very important for an optimal and successful final result.
1. Pre-engineering and sales process
We draw out the main parameters: waste capacity, waste type, chemical composition of waste, Cl content, etc. and this defines the type of combustion chamber and type of flue gas treatment. Out of this we will know what are the costs of the investment and the running costs for the flue gas treatment.
Secondly, there is the energy recovery. It is important to analyze all possible energy recovery systems which are suitable for your site and investment.
This step will result in :
- a blockdiagram of the waste incinerator
- a business plan of the waste incinerator
- a harmonogram of delivery and supply of all separate parts of the waste incinerator
- a first lay-out drawing of the waste incinerator
In this period it will be possible to create a first drawing of the incinerator building and the site lay out. If the investor knows these general lines, all the permits should be in line with these. Mostly this is a parallel process.
2. Detailed process design and engineering
After the capacity and type of energy recovery is decided the detail engineering phase starts. We design exactly the size of the incinerator equipment, rotary kiln, feeding system, boiler, etc. and we produce the mechanical construction drawings for the workshop.
The create the instrumentation list, the electrical drawings for the panels and the assembly drawings. And after this we prepair the PLC software for the control of the incineration plant. The basic of the PLC software is analyzed here, and the SCADA will be done and tested in the commissioning phase.
3. Manufacturing and purchase of instruments
The mechanical drawings will be submitted to the workshop for manufacture of the elements, first we start with the elements like rotary kiln and post combustion because they need the refractory inside.
The sequence of submitting the drawings to the workshop depends also on the appointments with the civil works on the construction field. If on the construction field there is only access from 1 end, for example from chimney side, we need to deliver first the chimney, scrubber and bag house, so we should start to construct the incinerator plant from that side, and so we need to deliver first those parts, and we submit first those part to the workshop.
Also electrical cabinets are done in the electrical workshop, and pre-tested before being delivered on site.
4. Assembling on site
Delivery of equipment on site, unloading trucks is done together with assembly of the incinerator plant. This equipment (and payments) are according to the harmonogram in cooperation with the civil works and the construction of the building. A few examples:
- No roof is easy for assembly of heavy elements with a crane.
- A roof is needed to deliver the electrical panels.
- The roof is done on the other side of the building where the assembly is done for security reasons
We need to pay attention on the fact that on this phase people start to see the reality, and often some new idea's are born. A change mostly cost time (and sometimes also money), this freedom is an issue we need to keep in mind during site assembly.

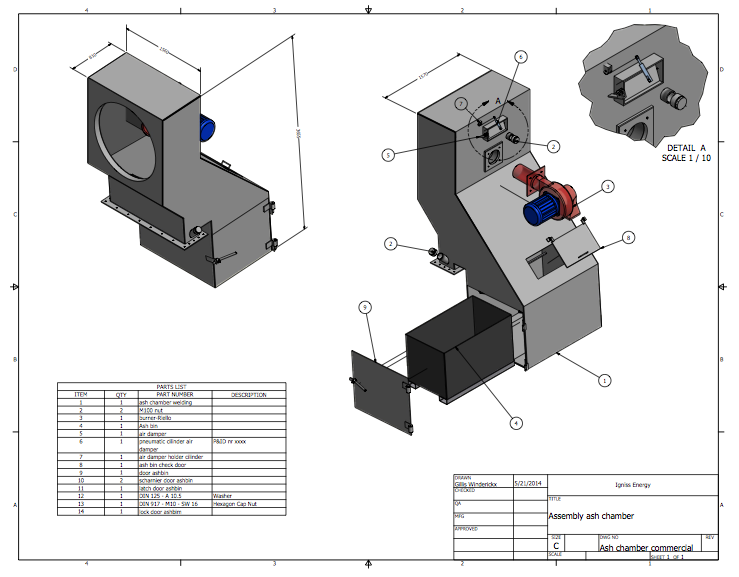
Photo : example of an assembly drawing of an ash chamber of a rotary kiln incinerator
5. Testing and commissioning
When the plant is complete, we test if all signals are arriving to the PLC and if the visualization of the system is correctly working. This is first done without there is fire made in the installation. This step is often called cold testing.
If all sensors work properly, we can commission the burners and cure the refractory. Refractory curing is slowly heating up the refractory so the water which is in the refractory is able to evaporate. This must be done only with new casted refractory. One's the water is out of the refractory, the heating up of the installation can be done faster. If the refractory contains water, and this water is not able to evaporate fast, the refractory will be damaged because the water will become steam and the steam need to escape. If there is no way to escape, the steam will create a way out by damaging the refractory.
When the refractory is heated up, we can start to feed waste to the incinerator and test different settings. Testing different settings are important in order to discover the correct reaction of the process and the energy recovery system. The correct settings depends on the waste type on the wanted energy parameters. The optimal parameters will create a reliable working incinerator.
During this phase workers and staff people receive training and learn all different issues on the incinerator plant by trying it and assisting.
6. Warranty period, operation, service after sales and feedback to improve design
After start up, and a few months of operation other issues will become clear. Is refractory holding strong on all places, is the boiler always easy in operation, or is there corrosion on certain places with a specific type of waste, etc.
The feedback after 8000 hours operation or more is very necessary to have feedback on design improvements.


